Appearance
Integrate
This guide provides step-by-step instructions to integrate AuthC (v2.0+) with your backend and frontend systems, covering security best practices and advanced configuration options.
Prerequisites
Node.js v22+ (or equivalent runtime)
AuthC server v2.0+ installed and running
Required NPM packages:
bashnpm install jose jwt-decode
Backend Integration
1. Key Management
When you start the AuthC server, a secret key is generated at the path specified by SERVER_KEY_PATH=./keyfile in JSON Web Key (JWK) format.
This key is used to SIGN JWTs by AuthC and must be used to VERIFY JWTs on your web service or backend API.
Important:
- The key must be identical on both AuthC and your backend, even if they are hosted separately.
- Share the key securely (e.g., copy the file or use a secure environment variable).
Example JWK
json
{
  "key_ops": ["sign", "verify"],
  "ext": true,
  "kty": "oct",
  "k": "EClK3wR3GxRM2sIAfZE00IGkpM_HeTVdy_H93_EqDcddonfEMWQpSrtGju_xFC9vGUAzHAcREbUe1XeodmTZ2Q",
  "alg": "HS256"
}
2. Import & Use the Key in Your Backend
Step 1: Import the JWK key in your backend service.
javascript
// key.js
import { readFileSync } from "fs";
import { webcrypto } from "crypto";

const { subtle } = webcrypto;

export async function importKey() {
  try {
    const rawKey = readFileSync("./keyfile");
    const importKey = JSON.parse(rawKey);
    return await subtle.importKey("jwk", importKey, { name: "HMAC", hash: "SHA-256" }, true, ["sign", "verify"]);
  } catch (error) {
    console.error("Error importing key:", error);
    throw error;
  }
}
Step 2: Verify incoming JWTs in your web service using jose:
javascript
// jwt.js
import * as jose from "jose";
import { importKey } from "./key.js";

export async function validateJWT(jwt) {
  try {
    const secretKey = await importKey();
    const { payload } = await jose.jwtVerify(jwt, secretKey);
    return payload;
  } catch (error) {
    throw {
      statusCode: 401,
      message: "Unauthorized: Token validation failed.",
    };
  }
}
Best Practice:
Always deny access to your APIs if JWT verification fails.
Frontend Integration
After a user successfully registers or logs in, the AuthC server:
- Stores the access token (JWT) in local storage
- Sets the refresh token as a cookie
- Redirects the user to your frontend application's URL
(set withAPPLICATION_ORIGIN=http://localhost:3002/home)
1. Check Login State
javascript
if (!localStorage.getItem("ACCESS_TOKEN")) {
  window.location.href = "http://auth.example.com";
}
2. Use JWT in API Requests
Always include the JWT as a Bearer token in the Authorization header:
javascript
const token = localStorage.getItem("ACCESS_TOKEN");

const response = await fetch(yourWebService, {
  method: "POST",
  headers: {
    "Content-Type": "application/json",
    Authorization: `Bearer ${token}`,
  },
  body: JSON.stringify(yourData),
});

const result = await response.json();
console.log(result);
3. Decode JWT on the Client
Access claims within the JWT using jwt-decode:
javascript
import jwtDecode from "https://cdn.skypack.dev/jwt-decode";

const token = localStorage.getItem("ACCESS_TOKEN");
const decodedClaims = jwtDecode(token);
console.log(decodedClaims);

/* Example output:
{
  "sub": "pr82e357hdg5w27hf4cmcrht",
  "name": "Auth C",
  "email": "authc@example.com",
  "scope": "user",
  "iss": "authcompanion",
  "aud": "authcompanion-client",
  "jti": "57b43735-bba9-4c79-bd3b-cc0bec8da19c",
  "iat": 1746472155,
  "exp": 1746475755
}
*/
4. User Logout
Remove the token from local storage to logout:
javascript
function logoutUser() {
  localStorage.removeItem("ACCESS_TOKEN");
  // Optionally, redirect to login
}
Implementing Silent Refresh (Recommended)
Silent refresh enables your app to automatically obtain a new access token using the refresh token—no user intervention required.
Default Access Token Lifetime: 1 hour
Steps:
- Attempt API request with current access token.
- If response is
401 Unauthorized, request a new token from AuthC's/auth/refreshendpoint. - Retry the original API request with the new access token.
javascript
async function fetchResourceWithToken() {
const token = localStorage.getItem("ACCESS_TOKEN");
return await fetch("/private/resource", {
method: "POST",
headers: {
"Content-Type": "application/json",
Authorization: `Bearer ${token}`,
},
body: JSON.stringify(yourRequestData),
});
}
async function refreshAccessToken() {
const res = await fetch("http://127.0.0.1:3002/v1/auth/refresh", {
method: "POST",
headers: { "Content-Type": "application/json" },
body: JSON.stringify({}),
credentials: "include", // Ensure cookies are sent!
});
const body = await res.json();
if (res.ok) {
localStorage.setItem("ACCESS_TOKEN", body.data.attributes.access_token);
return true;
}
return false;
}
async function handleResourceResponse() {
let response = await fetchResourceWithToken();
if (response.status === 401) {
const refreshed = await refreshAccessToken();
if (refreshed) {
response = await fetchResourceWithToken();
} else {
console.error("Silent refresh failed – user must log in again.");
return;
}
}
const data = await response.json();
// Proceed with data
}
// Call on startup or when making authenticated requests
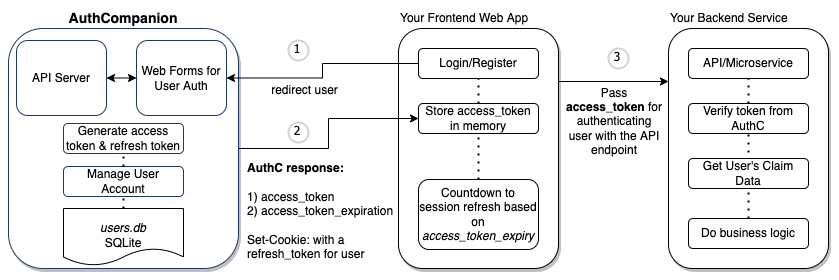
handleResourceResponse();Reference Architecture
Your integration should resemble the following architecture:
Further Reading
For questions, consult the AuthC documentation or reach out to the maintainers.